Friday, December 28, 2012

Organizing ...


Hi all!

I like to think of myself as being organized, but the truth is that I am not organized when it comes to paperwork.  I am a logical, sequential thinker, but I tend to put papers into piles.  When one pile gets high, I start another.  Sad, very sad .. and definitely not organized.

But there are some areas of my classroom that are very organized:

1)  My student drawers ... 


I do not have cubbies, so I use these drawers from Costco.  The drawers are numbered from 1-30.  (In the past I only had 20 students, but now I have gone up to 26.)  My students are numbered from 1 to 26.  After I correct their work, it is placed in the correct drawer.  Then homework folders are easy to stuff once a week with their finished and corrected work.  (I am so blessed to have an amazing volunteer aide from the middle school next door; she spends about four hours a week helping me with this type of clerical work.  I love her dearly and will be sad at the end of the semester when I lose her!!!)


2)  Our classroom library ...


I have about 2,000 books in the classroom library.  (The longer you teach, the more books you accumulate!!!  In other words, I have been teaching a long time.)  With that many books, I needed to create a system that would allow students to both find and put away books.  I sorted books by topics and then put each topic into a different tub (example: weather).  I have about 50 tubs.  This photo shows just one section of tubs.  Each tub was given a number and each book in that tub labeled with that number.  My previous post has more information on this system.  I also have a "book hospital" for books that need repair.  My students place books there when they notice a rip (even if the rip is invisible to the naked eye).


Okay, now on to my goals for organizing ... 

I will create an organization system for my paperwork.  This will consist of:
1)  A tub for papers I want to copy.
2)  A tub for papers that need to be corrected.
3)  A tub for papers that need to be sorted.  NO MORE PILES!

I also want to create a better system for my stations that are supervised by parent volunteers.  I plan to have five tubs (one per station) that I can label and prep ahead of time.  No more scrambling around in the hours before dawn (not really, but you know what I mean).

Whew!  If I keep these goals it will be a HUGE positive change for me!!  Wish me luck!

For more tips on organizing, head on over to Second Grade Shenanigans.  Here is the link!

Love to all,

Camille

Friday, December 14, 2012

Silence to Honor and Remember

A parent came up to me after school and threw her arms around me.  With tears in her eyes, she said, "I just felt like hugging you today."  Then she told me the news.

My heart is broken for all of the children, teachers and parents of Sandy Hook.  We will hold our little ones a little closer to our hearts as we remember you.
Love to all,
Camille

Tuesday, December 11, 2012

In Honor of 12-12-12

Tomorrow is 12-12-12!  I got to thinking about it and realized that there won't be another 12-12-12 for one hundred years.  That means this is the only one any of us get in our lifetime.  That is pretty monumental!  So .. I came up with 12-12-12 challenge for my firsties.  I found other ideas online, but I needed to simplify things for my kiddos.  We will be using this form tomorrow.  Here is the link in case you are interested:

12-12-12 Challenge

Love to all,
Camille

Thursday, November 22, 2012

Happy Thanksgiving!

Happy Thanksgiving my dear bloggy friends!  No special graphics, no brilliant ideas, just a wish for you.  We all have so much to be thankful for ... my wish for you is that you are able to spend time savoring the special moments on this holiday!
Love to all,
Camille

Saturday, November 3, 2012

Make a Turkey ... One Feather at a Time

I am swamped!  Assessments, report cards, special projects, just plain old survival in this crazy world and so what do I do?  BLOG!!!

Okay, this is a simple, fun family project from 2011.  (You could also do this project in class.)


Here is the finished bulletin board:


Here is a close-up:

(The hands were from a previous bulletin board that I loved and just couldn't bear to take completely down so for the rest of the year, those hands were a backdrop for everything that went up on this board.)

Family Feather Project:

I sent home a white feather cut from cardstock.  I asked each family to work together to design a feather to add to our very bare turkey.  The directions said they could use any materials they wanted to decorate the feather.  (One child used his sight word cards from our HM reading series to decorate the feather. Made.me.laugh.so.hard.  It is the feather with the red rectangles.)  We talked about how we needed all of our feathers to create the turkey.  Just one feather would not be enough.


Note: A thousand apologies for not knowing where I got the adorable turkey from.  It was a TPT purchase and students were supposed to measure the turkey, but I made an extra copy for this bulletin board.  But after searching through all of my purchases, I cannot find the original.  (Note to self: If you must purchase so many items from TPT, please keep your purchases organized!)  If you are the creator of this cute, cute turkey, just let me know and I will tell the world how wonderful you are!

Love to all,
Camille


Monday, October 29, 2012

Guess Who?

I haven't posted in a month so I think it is super ironic that this post is entitled "Guess Who?"  But the title has nothing to do with my lack of blogging.  (Although I am hoping you all remember me!)

Here is the true meaning of the title:

My students are working on their questioning skills so I pulled out one of my favorite activities to help with this:

Guess Who?


I bought this game at a garage sale for 50 cents a few years ago.  I hadn't played the game before, but I figured it would be worth at least 50 cents in my classroom.  Well, it has been worth quite a bit more than that!!  The price of the game is $18 at Target.  I am not sure I would pay that much, but many of you may have this game tucked away in a closet at home.

We play this game during our station rotation.  Here are the rules we use:

Guess Who?  A Game of Logic
1) Adult secretly picks a yellow card.
2) Children take turns asking yes/no questions to determine who the mystery person is.  Example: Is it a woman?  Does she have red hair?)
3) The adult answers each question and the child asking the question gets to “slide” down all of the people who cannot be the mystery person.  (example:  If “Is it a woman?” gets a no answer, then you must slide down all of the cards that have the picture of a woman.)
4) Continue asking and answering questions in turn.  When only one card is left, that must be the mystery person!  Compare the final card to the selected yellow card and see if they match.  Of course, they do!
5)  Prep the cards for a new round.  Once the children get the hang of it, they can pick the mystery person and answer the yes/no questions.

Challenge the children to ask questions that will eliminate as many people as possible.  Example: “Does the person have a hat?” eliminates more people than “Does the person have a green hat with a feather?”

After playing this game, the children have a much better understanding of what it means to ask a question.  Hurrah!

Love to all,
Camille  

Saturday, September 29, 2012

iTalk iPads: Story Creator

I am going to try to focus on one new iPad app a week.  That will insure that I keep trying new apps, plus will help me reflect on our use of iPads.

I have a new favorite iPad app: Story Creator.  I LOVE, LOVE, LOVE it!  What about my firsties?  They LOVE, LOVE, LOVE it, too!

Here is what makes this app so special:
  • It is free.  (How awful that I list this first, but you all know why!!)
  • It is easy to use.
  • Children can create their own books.
  • Drawings, photos and text are all easy to add to the books.
  • Audio can be added, as in, children type in their text and then record themselves reading the text.  Then when you scroll through the story, you hear the child's voice reading each page to you.  Oh, be still my heart.  I SO love this feature!
  • The tech support is phenomenal!  I sent an email to the developers asking a few questions and I received a reply.  A real reply.  But it gets better.  I got the reply within hours.  The reply contained answers to my questions.  Like I said: phenomenal support!
Here is what I don't like:
  • The only way to share the created books is via Facebook.  That means we are NOT sharing our books.  But this is one of the improvements on their list for the December upgrade.  (Which I know because I received an email telling me this. : )  This same thing tends to be a glitch in quite a few apps, especially the ones that are free.  So the books will stay on each iPad and have to be shared via buddy reading or author's chair.


Here is how I unrolled this app for my first graders:
  • Ahead of time I created a three page book using Story Creator.  The first page had a drawing and text, the second page had a photo and text and the third page had a photo, text, AND audio.  
  • I used my document camera to unveil my three page book.  (I just placed the iPad directly on the document camera so my kiddos could see.)
  • I showed my students how to access the app, how to start a book and explained each icon at the bottom.  All in all, my presentation was five minutes max.  I really try to not overdo my instructions with apps.  I want my students to have lots of freedom because then they will be much more creative.
  • I let my students loose to use the app.  Some of them began to draw pictures for their books.  Other started by taking photos.  A few students began adding audio as soon as they had typed in text.  Some students discovered the spelling correction feature.  (Which can be both a help and a hindrance with beginning readers!!!)
  • I buzzed around the room listening, reading and mainly learning from my amazing digital natives!
  • As a few students finished books, I sent them to the office to share their stories.  They came back with HUGE smiles.
  • We ran out of time or we would have had a sharing time at the end.  As it was, my students were VERY upset with me when I had them cleanup because it was time to go home.  ("What school is over?  "Can't we stay longer?  PLEASE!!!!")
That's it for now!

Love to all,
Camille


Saturday, September 22, 2012

iTalk iPads in September!

Sigh ... I really meant to post a lot more iPad ideas, but using iPads in kinder and first in the Fall is so very different than using them in the Spring that I am once again a beginner.

(Background: A class set of iPads was delivered to my room in April 2012.  My kiddos already had our routines down and had so many skills that we were able to immediately start using the iPads.  Starting off the year with iPads is completely different so I still figuring this out!!  Don't get me wrong, I LOVE the iPads.  It is just that I am at ground zero in the learning curve once again!!)

My kinders are learning about patterns so we have been using the iPads to aide our learning.  The kiddos have been using the app Doodle Buddy (free) to create patterns.  Doodle Buddy allows them to paint, draw or even stamp pictures.  We have been working on color and shape patterns.  So here are some of the activities we have done:

  • Students use two (or three) colors to create a pattern.  Another student has to tell what comes next.
  • I make a pattern with our manipulative bears (example: blue, red, red ... abb) and students have to make that same pattern using two different colors on their iPads.
  • Students use two (or three) shape stamps to make a pattern. 
  • I make a pattern using attribute shapes (example: circle, square, triangle ... abc).  Students have to stamp that same pattern on their iPads, using different shapes.
  • I make a pattern (example: aab) and students make that same pattern on their iPads, but they get to decide if they will make that pattern with shapes or colors or size.
What I am loving about all of this is that my students can quickly make multiple patterns this way.  They can take a screen shot of their patterns and then add it to the photo roll on their iPad.  Pretty cool! Sounds like the beginning of a portfolio to me!

Now I am off to plan for next week!

Love to all,
Camille

Sunday, September 16, 2012

An Apology

Sigh ... I am one of those people that rarely listens to their instincts.  The other day I blogged about a product that I had not used, but had seen a sample of and it looked promising.  Anyone who blogged about it, got the product free.  I LOVE free!  So instead of listening to my instincts that said, "Slow down!  This is too good to be true!" I blogged about it and received it and ... it is not something I can recommend for teachers.  So I removed that blog post and emailed the company, but I still feel icky.  Like a liar.  Like one of those celebrities that advertises a product that they would never use just for the money.  (Well, except I am not a celebrity and I never got any money, just a not-so-good product.)  So I apologize to anyone who read that post and if I ever mention a product again, it will be one that I have used and LOVE!!!  I promise!

Love to all,
Camille

A Wreath for My Door

One of my goals this year is to have my students take more ownership of the room.  One way to do that is to make sure THEIR work is featured, instead of mine.  So when I saw Greg Smedley's wreath idea, I decided to have my students help me make a wreath for our classroom door.

Here is the result:

I laminated the final result so it is shiny and a bit hard to photograph.  Sorry!


Here is a closeup ...


My kinders are the green hands and my first graders are the blue hands.  I wanted to color code it to show how we complement each other.  I used the large ink pads from Lakeshore because the ink is washable and so much easier to use than paint.  BUT I love the bright colors that are in Greg's wreath.  So ... next year I may brave the paint.  Not sure yet.  Since this was my first time creating a wreath like this, I was a bit controlling (sigh ... I am trying not to be, really I am!).

These were my steps:
1) Have each student make a handprint on white contruction paper.  (I did this on the first day when they were also making handprints for their Kissing Hand puzzle.  Very time efficient to make two handprints at once!)  I lightly wrote their name in pencil on the papers ahead of time so that I could make sure each child made a handprint.  (You know how confusing that first day is!)
2)  I cut out each hand and wrote each name with a Sharpie.
3)  I arranged and rearranged the hands on a large sheet of blue posterboard.
4)  I glued the hands down and then cut out the posterboard in an appealing shape.  (Maybe only appealing to me!!!)
5) I laminated and then recut the wreath.

Yep ... lots of teacher steps!  I WILL GIVE UP CONTROL!  I WILL GIVE UP CONTROL!  I WILL GIVE UP CONTROL! (But I have to check my schedule and decide when that will be!)

Love to all,
Camille

Thursday, September 6, 2012

A Personal Tribute

Today I am using my blog to pay tribute to a man who died far too young.  His name was Larry and he was my best friend and husband for 21 years.  Two years ago today Larry died in an accident doing what he loved best: biking.  He had just completed his favorite (and very strenuous) bike ride and was on his way home.  It was an accident with no one to blame.  It just happened.

So here is a photo tribute to my very favorite guy.

As a child ...  (early 1960's)


As a newly engaged man, with guess who?  Look at that smile! I used to tease him that if he kept smiling those ear to ear smiles, he might crack his face in two. (1988)


Just married ... and again that smile! (1989)

The honeymoon ... we went biking, of course!  (Tahoe 1989)


He had both a serious side (on rare occasions)...


and a goofy side.  The goofy side was MUCH bigger so he always kept me laughing.  


As the best man in his dad's wedding in 2010.  I love this picture because he is smiling at the photographer (ME!!!!!).


Our last trip to Lake Tahoe just a month before his death.  I am so glad that we took the time to go!


His favorite activity!  He loved to wear a yellow shirt when biking because that is the color won by the biking champions in the Tour de France.  


So, for those of you still with me, thank you for reading this and taking a moment to learn about my Larry.  He was an amazing man!  Sweet, fun, compassionate, courageous.  I could not have asked for a better husband.  Larry loved helping others and never let anything interfere with that.  Larry struggled with diabetes for over 40 years, but he never let that define who he was.  After his death, Larry's favorite nurse told me that he had every possible diabetic complication possible and that his pain must have been incredible.  I knew this and yet hearing it defined that way was stunning.  You see,  my sweet husband got up each day, put a smile on his face and provided cheer for the rest of us.  After his death, I was amazed at how many people came forward to tell me that Larry was one of their favorite people:  grocery clerks, pharmacists, many people that I did not know.  Once they found out who I was, they told me beautiful stories about Larry and how he had helped them in some way.  Most of the stories I did not know because for Larry being kind to others just came naturally.  It was his normal way of life.  So often I reflect on our time together and always come to the same conclusion:  Given a choice of being married to Larry for only 21 years or not at all, I would always take the 21 years.  It was not long enough, but it was wonderful.  I know that my sweet guy no longer feels pain and is busy biking and gardening in Heaven.  When I think about joining him there, I just know that he will be waiting for me with a tandem bike in hand so we can go biking together.  I can hardly wait!

Thanks for indulging me, my dear bloggy friends!  My advice to all of you is to savor each moment with your loved ones!

Love to all,
Camille


Sunday, September 2, 2012

Worst First Day EVER!

Okay, so it really wasn't THAT bad.  In fact, most of the day went really well.  Really, really well.  Until 1:50 and since we dismiss at 2:15, how bad could the last 25 minutes have been?  A.W.F.U.L.!!!  It wasn't my kiddos, they were great.  It wasn't me, I was trying my best to be engaging, which was easy because it was love at first sight with my class.

So what went wrong?  Well, at 1:50 our principal came on over the loudspeaker and announced, "Teachers, please lock your doors.  Dismissal will be delayed."  What????  Keep in mind that I teach in California where the classrooms are not in one building.  Instead, our doors all lead to the outside world.  That means once I locked the door, I was on my own.  The only adult.  No bathroom.  With a class of kiddos asking, "Why did she say to lock the door?"  My response, "I think she wants me to practice locking the door."  Huh?  I was not at my best since I was clueless as to what was going on.  But then my awesome principal (I really do love her), organized the office staff to call each classroom and let us know what was going on.  What was going on you wonder?  It turns out there was an armed robbery at a nearby bank.  One thief got away so the police alerted all of the nearby schools to go into lockdown.  A real, true lockdown.  Although over the years, we've had lockdown drills, this was my first real lockdown.  As soon as the police called, the gates around the school were all closed and locked.  All our classroom doors were locked.  We were completely safe the whole time.  But it was scary!  I was so glad that I teach first graders because they were completely clueless as to any problem going on.  They were also clueless about dismissal time.  We ended up being dismissed at about 2:45 and my kiddos didn't even know they were in school an extra 30 minutes.  I was also grateful that I was a veteran teacher and could reach into my bag of tricks and come up with an instant lesson.  What did we do?  Clay!  I had it all prepped for the next day, so I pulled it out and the children were enamored and oh, so sad when I got the "all clear" call and we got to evacuate.

I told you this was the worst first day ever, but it was also the best.  The most amazing thing happened as we evacuated.  The entire community pitched in to help.  Classes were called to the front gate one at a time.  There were escorts all along the way ... support staff, district office personnel, parents. All making sure we knew what to do and that all was well.   It was so moving to see the support we were being given.  I actually started crying (and then had to quickly suck it up so my kiddos wouldn't get worried.)  As my class got close to the front gate, a parent announced, "Mrs. Johnson's class".  The waiting parents who had children in my class stepped forward and all of the other parents stepped back.  I still get teary-eyed thinking about it.  And bear in mind that this was the FIRST day of school.  Somehow our amazing school community came together and created a safe, nurturing environment in the midst of a lockdown.  So on the first day two messages came out loud and clear:  Children are loved and protected at this school! AND We are a community that works together!

So that is my first day story.  After that, the rest of the week was lowkey.  ... and yes, the other thief was caught miles and miles from my school.

Love to all,
Camille

Saturday, September 1, 2012

My Room With a View


Hi all!  I just finished my first week and thought I would show you some photos from my finished classroom.  These photos were taken prior to the first day of school.  The bulletin boards are sadly lacking student work, but in just five days that has changed!  This is my new room and I have never, ever taught in a room this large.  I have already told my principal that I love this room so much, I want to stay in it forever!


Welcome to my classroom!  My school is located in a city with mild weather so our classroom doors open to the outside world.  


This is my third year teaching a kindergarten / first grade combination class.  I refer to my class as a "winning combination".  Since we are in room eight, we are "Team Eight".  The only problem is that I was in room five for about fifteen years so I keep slipping up and calling my class "Team Five".  Whoops!  My kiddos keep laughing and reminding me of our room number.  The other sign to the left of the door is a class list.


 I usually make an adorable door display with student names, but I had important family obligations this year, so I quickly put up this poster.  I added "and first grade" to the title of the poster just after taking this photo.  (I don't want my first grade families think there is nothing left to learn!)


Here is the entry to the classroom.  I put a bookcase (backwards) next to the door so it would feel like an actual entry way.  On the bookcase are my "Stop and Drop" (the short blue tub) which is where students place notes, homework, etc.  The two cute tubs are for snacks.  Kinders place their snacks in green and firsties in blue.  (I try to color code as much as possible since my students have different dismissals and that makes clean up so much easier.)


Here are the two snack tubs close up.  They are a Dollar Store find!


This is the other side of the bookcase.  This is the main classroom library, but there are tubs in other places in the classroom also.  My books are organized by topic or author.  Each tub has a number and each book in the tub has a sticker with that number on it.  I learned this system on the Sisters website and I LOVE it!!!  Oh, if you look closely, you can see my READ letters (Thank you Pinterest!) on the left.  I velcroed them to that case.  Side note:  Who chose this carpet for a classroom?  Seriously, it makes my eyes spin in my head just looking at this photo.  Walking on it is far worse.


Continuing around the room, here is my read aloud area.  There is actually plenty of room for all 26 kiddos to sit, but I know it looks super small - it is NOT!


The calendar area.  I tried to place most items low enough for students to reach.  It looks way too busy doesn't it?  In real life it looks a little tamer.


Pocket chart all ready for day one.  I am not sure which blog I got this chant from.  But I love it!  So thank you to the creator!


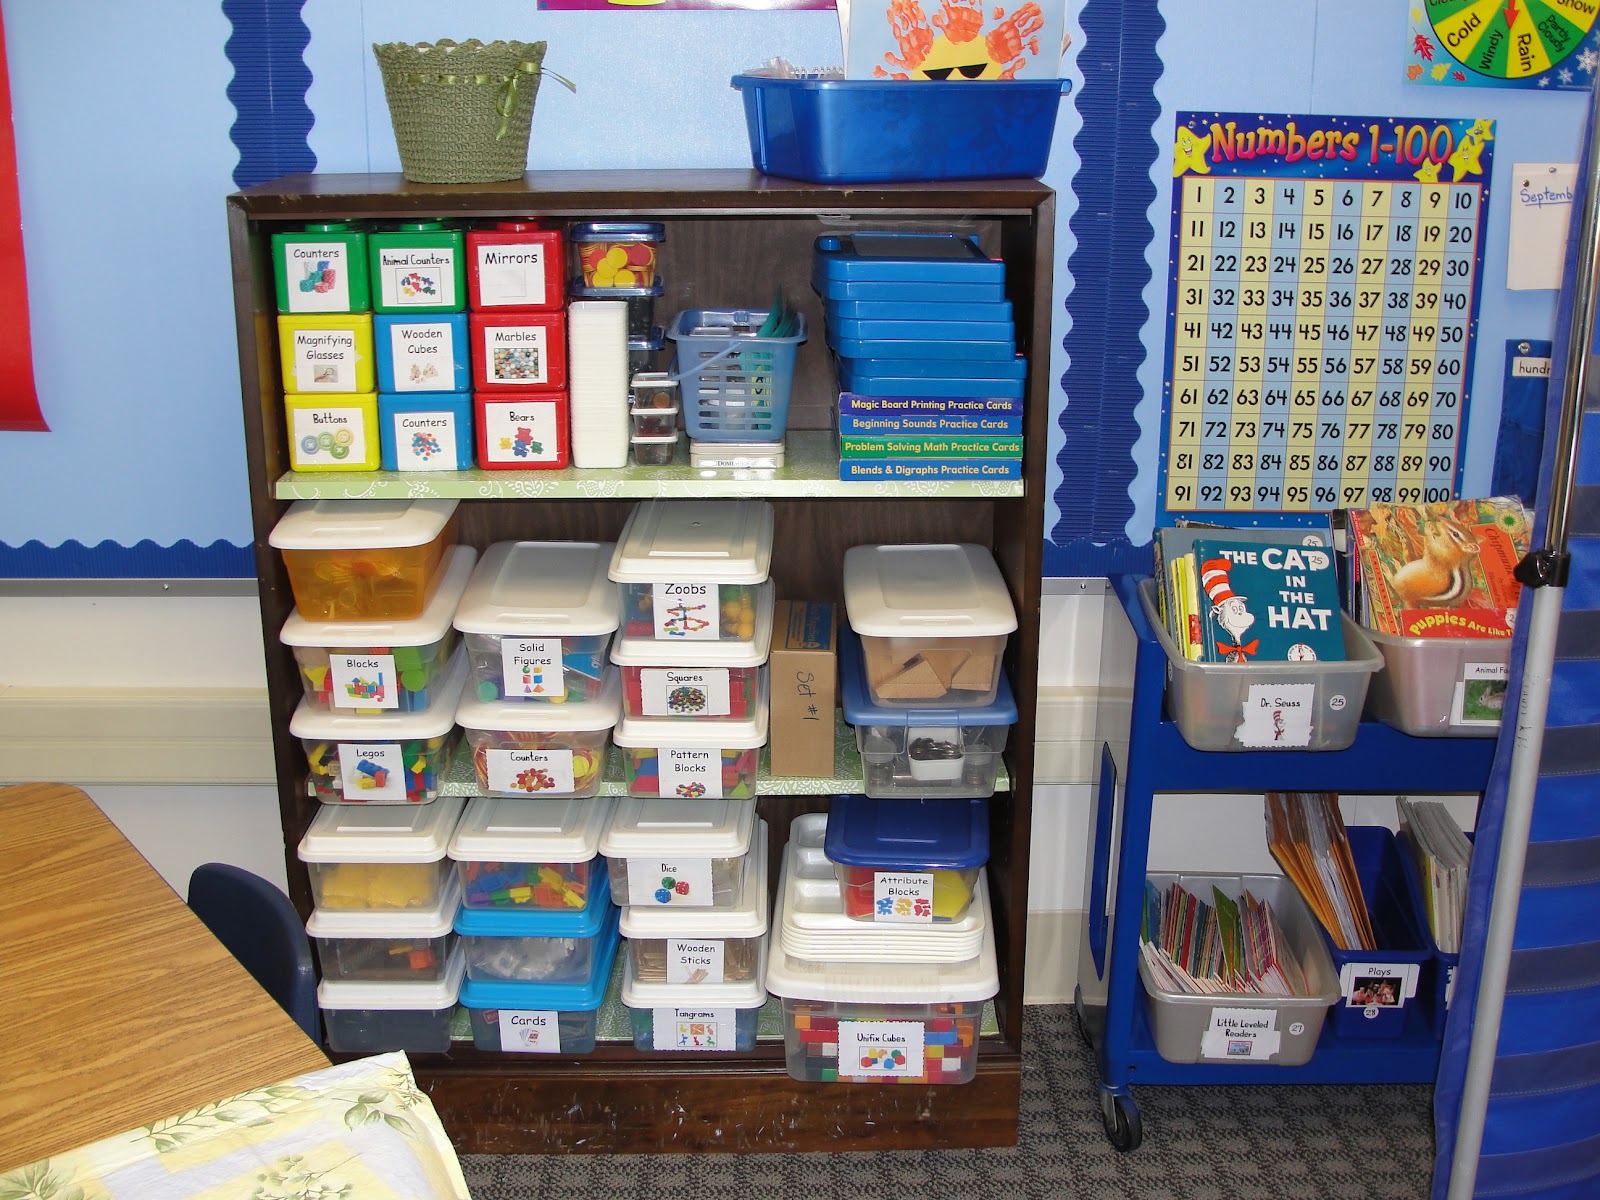
Our math manipulatives.  All tubbed and labeled and ready to go!


Okay, time for an age test.  Are you old enough to recognize these containers?  If not, they originally contained wet wipes about 15 years ago.  I used to have parents of babies save them and send them in.  I  have been using them ever since.  I only wish I had more!


Here is my small group teaching table.  It won't normally look like this, but I wanted it cute for day one.  Behind it are more books, and two bulletin boards.  One is for FACE / CAFE and the other is the Word Wall.


An EL teacher once told me to use photographs whenever possible, so I love these cards for the Word Wall.  This wall now contains all of our names.  I had each student walk up and show me where his/her name should go.  Harder for some than for others!!!  Oh, I do love this blue color so much.  I painted all of my bulletin boards this color.


Birthday bags ready to go.  Thank goodness since I had a birthday on Day One!!!!  This was the first time I put border around a white board and I love it!  Thank you Pinterest!  Oh no, here is my voice chart and I can't remember who to credit.  Sorry times a thousand!


My Welcome Sign a la Pinterest.  I purchased the black letters from Fourth Grade Frolics at TPT.  Here is the link.  I actually meant to cut out triangles to glue them on, but I got distracted and starting cutting out circles.  By the time my brain re-engaged, I had already cut several circles so I went with circles.  What a dope!  You can't tell, but blue and green paper is totally adorable.  I got it from the Dollar Store.

Behind the Welcome Sign is my almost new Smartboard.  Sigh, I love it so!  BUT I  have so much to learn about truly using it to its full capacity!!!


My area.  Teacher computer (also used by students as needed), my Pinterest inspired organizer, and various pens, etc.  The blank spot has now been filled in with my document camera.  (Thanks to the marvelous IT guys in my district!!)  I made the table skirt two years ago and velcroed it to this table to hide all the wires and electrical boxes, etc.


More books, more books, more books.  (I have over a thousand books.  Not sure how many over.)

The bulletin board is for our monthly TLC quilt squares. The title reads: Our Class Quilt.  You can order the TLC Quilt Book here.  I highly recommend it!!  If you teach kinder, prekinder or first be sure to check out the many wonderful TLC books that are available at their site.


Our computer area.  We stopped using our computers last year when we got iPads.  Not sure what this year will hold.


... and here we have my favorite of all favorites: my filing cabinet!  In case you missed my previous post, I painted this myself and do love it so!  It was once a plain, gray filing cabinet.  Now it is my pride and joy!  (Oh, please do not panic ... I do love the kiddos in my class even more than I love this file cabinet!)


Check out all this counter space!  (Sorry for the dark photo!)  There are cabinets underneath the counter and I am amazed at all this storage space.  (Of course, I have already filled it.)  On top of (and under) that table are more books that need to be numbered to go into bins.

Look at all those windows and that great view of trees.  L.O.V.E.


One more small group area.  Not sure how I will use this yet.


I don't have cubbies (and wish I did!) so instead I use these drawers to sort student work.  Back in the good old days (three years ago) I only needed 20 drawers.  But now I need 26 for my class.  I am hoping we stop at 26, but I look at other schools in California and see that many of them have 30 or more in kinder and first grade so I am thinking that my numbers may go up in future years.


I feel like I took a billion photos, but realize now that I left out the back part of the room.  I think maybe it was so messy that day that I didn't want to photograph it.  Now the messiness is shoved into cabinets and may never be straightened out.

Thank you for touring my classroom with me!

Love to all,
Camille

Monday, August 20, 2012

Made It and LOVE It!!

This is my third and last "Monday Made It" post.  Goodbye to lazy summers and hello to school starting! 


Oh, I so love my two newest projects.  Love, love, love them!

First up:  Lovely Curtains
I already showed you my little curtain for my window in the door.  I liked it so much that I decided to make curtains for all of my windows.  I got the inspiration from here.  However, I could not find an adorable plastic tablecloth so I found a paper one I loved and laminated it.  (Thanks to Lakeshore and their 29 cents/foot laminating charge, my total cost for tablecloths and laminating came to under $20.  Not too bad since I have 34 feet of windows!!!)  Yes, my new room is giant-sized and I have windows running the entire length of one long wall!  Love, love, love!


...and now onto my favorite of all favorites ...  My File Cabinet. True confession:  I am in love with my file cabinet!

I got the inspiration from here.

I did not take a before picture so you will have to imagination a perfectly fine, gray file cabinet.  Nothing wrong with it at all.  But nothing to write home about.  Now look at it:


And here is another look:

And a closeup:


Love, love, love, love, love!

First I spray painted the file cabinet.  (My beloved custodian hauled it outside for me and then brought it back in the next day when it was dry.)  Then I used a white paint pen to draw the lines.  I know it looks like a five year old drew those lines, but it was me trying my best!  I actually think those crooked old lines look quite charming!  So this file cabinet is now, officially, my favorite part of my room.

Be sure to check out the inspiring projects over at Tara's Fourth Grade Frolics!

Love to all,
Camille

Monday, August 13, 2012

Monday Made It Number Two!


Tara over at Fourth Grade Frolics is already on Monday Made It #11, but this is just my second time to link up.

I have been painting like crazy in my new room.  First the bulletin boards, then the bookcases and then ... anything that didn't move.  (Well, not really, but almost!!!)  Besides painting, I did FINALLY made a few Pinterest items that it seems like EVERYONE else made months ago.  Try not to be too, too, too bored.  Here they are:

1)  READ letters


I love these!  I used scrapbook paper and ModPodge.  This was my first ModPodge project ever.  The bubbles were unexpected and a pain, but with persistence, I got rid of most of them.  A few stayed, but I still love my letters.


2) Teacher's Toolbox


While a friend was in my classroom today, she asked me for a postit.  Rather than just handing her one, I dragged her over to my toolbox so she could watch me open the labeled drawer and pull out a postit.  What a dope I am!  But she is a sweetie so she oohed and awed over my toolbox.  Heh heh!

Be sure to check out the amazing, brilliant, creative things that other teachers are making over at Fourth Grade Frolics!

Once I have the painted furniture in place, I will post pictures.  I am so excited that my classroom is starting to shape up and look like an actual classroom (versus a storeroom filled with boxes).


Love to all,
Camille