Okay, so it really wasn't THAT bad. In fact, most of the day went really well. Really, really well. Until 1:50 and since we dismiss at 2:15, how bad could the last 25 minutes have been? A.W.F.U.L.!!! It wasn't my kiddos, they were great. It wasn't me, I was trying my best to be engaging, which was easy because it was love at first sight with my class.
So what went wrong? Well, at 1:50 our principal came on over the loudspeaker and announced, "Teachers, please lock your doors. Dismissal will be delayed." What???? Keep in mind that I teach in California where the classrooms are not in one building. Instead, our doors all lead to the outside world. That means once I locked the door, I was on my own. The only adult. No bathroom. With a class of kiddos asking, "Why did she say to lock the door?" My response, "I think she wants me to practice locking the door." Huh? I was not at my best since I was clueless as to what was going on. But then my awesome principal (I really do love her), organized the office staff to call each classroom and let us know what was going on. What was going on you wonder? It turns out there was an armed robbery at a nearby bank. One thief got away so the police alerted all of the nearby schools to go into lockdown. A real, true lockdown. Although over the years, we've had lockdown drills, this was my first real lockdown. As soon as the police called, the gates around the school were all closed and locked. All our classroom doors were locked. We were completely safe the whole time. But it was scary! I was so glad that I teach first graders because they were completely clueless as to any problem going on. They were also clueless about dismissal time. We ended up being dismissed at about 2:45 and my kiddos didn't even know they were in school an extra 30 minutes. I was also grateful that I was a veteran teacher and could reach into my bag of tricks and come up with an instant lesson. What did we do? Clay! I had it all prepped for the next day, so I pulled it out and the children were enamored and oh, so sad when I got the "all clear" call and we got to evacuate.
I told you this was the worst first day ever, but it was also the best. The most amazing thing happened as we evacuated. The entire community pitched in to help. Classes were called to the front gate one at a time. There were escorts all along the way ... support staff, district office personnel, parents. All making sure we knew what to do and that all was well. It was so moving to see the support we were being given. I actually started crying (and then had to quickly suck it up so my kiddos wouldn't get worried.) As my class got close to the front gate, a parent announced, "Mrs. Johnson's class". The waiting parents who had children in my class stepped forward and all of the other parents stepped back. I still get teary-eyed thinking about it. And bear in mind that this was the FIRST day of school. Somehow our amazing school community came together and created a safe, nurturing environment in the midst of a lockdown. So on the first day two messages came out loud and clear: Children are loved and protected at this school! AND We are a community that works together!
So that is my first day story. After that, the rest of the week was lowkey. ... and yes, the other thief was caught miles and miles from my school.
Love to all,
Camille
Showing posts with label first day. Show all posts
Showing posts with label first day. Show all posts
Sunday, September 2, 2012


Friday, August 12, 2011
More About Pete
Hi all!
I am stressed out of my mind preparing (or should I say, not preparing???) my classroom. There is so much to do that I spend most of my time thinking about all there is to do! Crazy!! But I did finish one task. Hurrah! The clues for my Pete the Cat hunt are now complete. In a previous post I explained my plan and gave a list of all of my clues. Since I don't know how to add colorful graphics to documents, I had to cut and paste (yep, with scissors and glue). But I LOVE how they turned out! (...and yes, I have added "Learn to add colorful graphics to documents" to my TO DO list!!!!) For my cards I used pictures from a bulletin board border I found at the Dollar Store. Here is the first card:

Now it is time for this girl to go on into the classroom!
Take care my hardworking friends,
Camille
I am stressed out of my mind preparing (or should I say, not preparing???) my classroom. There is so much to do that I spend most of my time thinking about all there is to do! Crazy!! But I did finish one task. Hurrah! The clues for my Pete the Cat hunt are now complete. In a previous post I explained my plan and gave a list of all of my clues. Since I don't know how to add colorful graphics to documents, I had to cut and paste (yep, with scissors and glue). But I LOVE how they turned out! (...and yes, I have added "Learn to add colorful graphics to documents" to my TO DO list!!!!) For my cards I used pictures from a bulletin board border I found at the Dollar Store. Here is the first card:

Now it is time for this girl to go on into the classroom!
Take care my hardworking friends,
Camille
Tuesday, August 9, 2011
Where's Pete? Forget Waldo, We Want to Find Pete!
Last week I ordered a stuffed Pete the Cat from Amazon and I have been waiting patiently (HAH!) for Pete to be delivered to my house. I keep wondering, "Where's Pete?" which prompted me to write clues for a hunt for Pete. (Very similar to the Gingerbread Man hunt.) These clues are nothing brilliant, but I want to share them with all of you. I am offering them just as they are - no graphics, no fancy fonts. See what you think. If someone likes them enough to fancy them up: GREAT!! - just let me know.
Here is my plan - I will read the book Pete the Cat to my class on the first day of school. After finishing the book an envelope will mysteriously drop out of the book. The envelope will be addressed to Team Five. (I teach in room five so I refer to my class as Team Five.) Upon opening the envelope, we will find this note:
Dear Team Five,
My name is Pete and I am a cat.
I've been waiting for you, but where are you at?
I decided to look around; everything is so new.
But to help you find me, I will leave a clue.
Clue #1:
I went to Mrs.P to look for you.
She's so smart, she'll tell me what to do.
Walk, walk, as quiet as a hat.
Please find me; I'm Pete the Cat.
(Mrs. P is our secretary so we will go to the office and meet both Mrs. P and the principal if she is available. While there Mrs. P will hand us clue #2.)
Click here for the rest of the clues
Here is my plan - I will read the book Pete the Cat to my class on the first day of school. After finishing the book an envelope will mysteriously drop out of the book. The envelope will be addressed to Team Five. (I teach in room five so I refer to my class as Team Five.) Upon opening the envelope, we will find this note:
Dear Team Five,
My name is Pete and I am a cat.
I've been waiting for you, but where are you at?
I decided to look around; everything is so new.
But to help you find me, I will leave a clue.
Clue #1:
I went to Mrs.P to look for you.
She's so smart, she'll tell me what to do.
Walk, walk, as quiet as a hat.
Please find me; I'm Pete the Cat.
(Mrs. P is our secretary so we will go to the office and meet both Mrs. P and the principal if she is available. While there Mrs. P will hand us clue #2.)
Click here for the rest of the clues
Monday, July 18, 2011
Paper Plate Frisbees
Jodi over at Fun in First is having a linky party. Now normally I am NOT a party kind of girl. But this party is all about activities for the beginning of the year so I am soooo in!! Jodi posted a super cute version of a gingerbread man hunt. Plus other activities are being added even as you read this!
Here is my addition to the party. Oh, it's super simple, because I am a super simple girl. But it's tons of fun for the kiddos, because I LOVE having fun with my kids!!
Paper Plate Frisbee
Students will each get to decorate and then fly a frisbee.
Preparation:
Ahead of time I buy two paper plates per child. (This year I purchased 60 plates just in case we really and truly have 30 students next year. Ouch! Ouch! Ouch!) The thin white picnic ones won't work, but anything just a tad sturdier will. This year I got mine from the dollar store.
The next step is to cut a hole out of the middle of HALF of the plates. (Leave half of the plates whole.) The diameter of the hole is about five inches. (The exact measurement is NOT important. Many plates have an inner circle and I just cut on that.) Then staple a whole plate to a plate with a cut circle. For example, if you purchased blue plates (my favorite color) face the blue part of the whole plate to the blue part of the "holed" plate and staple about four times around the edge of the plate. You now have one frisbee. : ) Repeat this until you have enough frisbees for each student.
Hurrah! Teacher prep is done!!!
Note: I have kinders and firsties so do this prep for them. With older students, you might have them do the prep.
Now for the fun:
Students decorate the plates using crayons or markers or ???? I have them write their names BIG on the frisbee. Then we take them out and fly them. Great fun! These frisbees work great and the students run around having a blast (once they get the hang of throwing them.) It is a great way to begin to build community because the students are all running all over the field interacting with each other. Did I already say it was great fun?
I let the students take the frisbees home that day so that they can have fun with them at home.
Update: August 31, 2012: I remembered to take photos this year. This time I wrote the names on the frisbees. This lovely girl has just started decorating her frisbee.

Here is the other side of her frisbee. The plates were red this year. But since I staple the two plates towards each other, the frisbees are white on the outside.

Here is my addition to the party. Oh, it's super simple, because I am a super simple girl. But it's tons of fun for the kiddos, because I LOVE having fun with my kids!!
Paper Plate Frisbee
Students will each get to decorate and then fly a frisbee.
Preparation:
Ahead of time I buy two paper plates per child. (This year I purchased 60 plates just in case we really and truly have 30 students next year. Ouch! Ouch! Ouch!) The thin white picnic ones won't work, but anything just a tad sturdier will. This year I got mine from the dollar store.
The next step is to cut a hole out of the middle of HALF of the plates. (Leave half of the plates whole.) The diameter of the hole is about five inches. (The exact measurement is NOT important. Many plates have an inner circle and I just cut on that.) Then staple a whole plate to a plate with a cut circle. For example, if you purchased blue plates (my favorite color) face the blue part of the whole plate to the blue part of the "holed" plate and staple about four times around the edge of the plate. You now have one frisbee. : ) Repeat this until you have enough frisbees for each student.
Hurrah! Teacher prep is done!!!
Note: I have kinders and firsties so do this prep for them. With older students, you might have them do the prep.
Now for the fun:
Students decorate the plates using crayons or markers or ???? I have them write their names BIG on the frisbee. Then we take them out and fly them. Great fun! These frisbees work great and the students run around having a blast (once they get the hang of throwing them.) It is a great way to begin to build community because the students are all running all over the field interacting with each other. Did I already say it was great fun?
I let the students take the frisbees home that day so that they can have fun with them at home.
Update: August 31, 2012: I remembered to take photos this year. This time I wrote the names on the frisbees. This lovely girl has just started decorating her frisbee.

Here is the other side of her frisbee. The plates were red this year. But since I staple the two plates towards each other, the frisbees are white on the outside.

Friday, July 15, 2011
Day One: The Kissing Hand
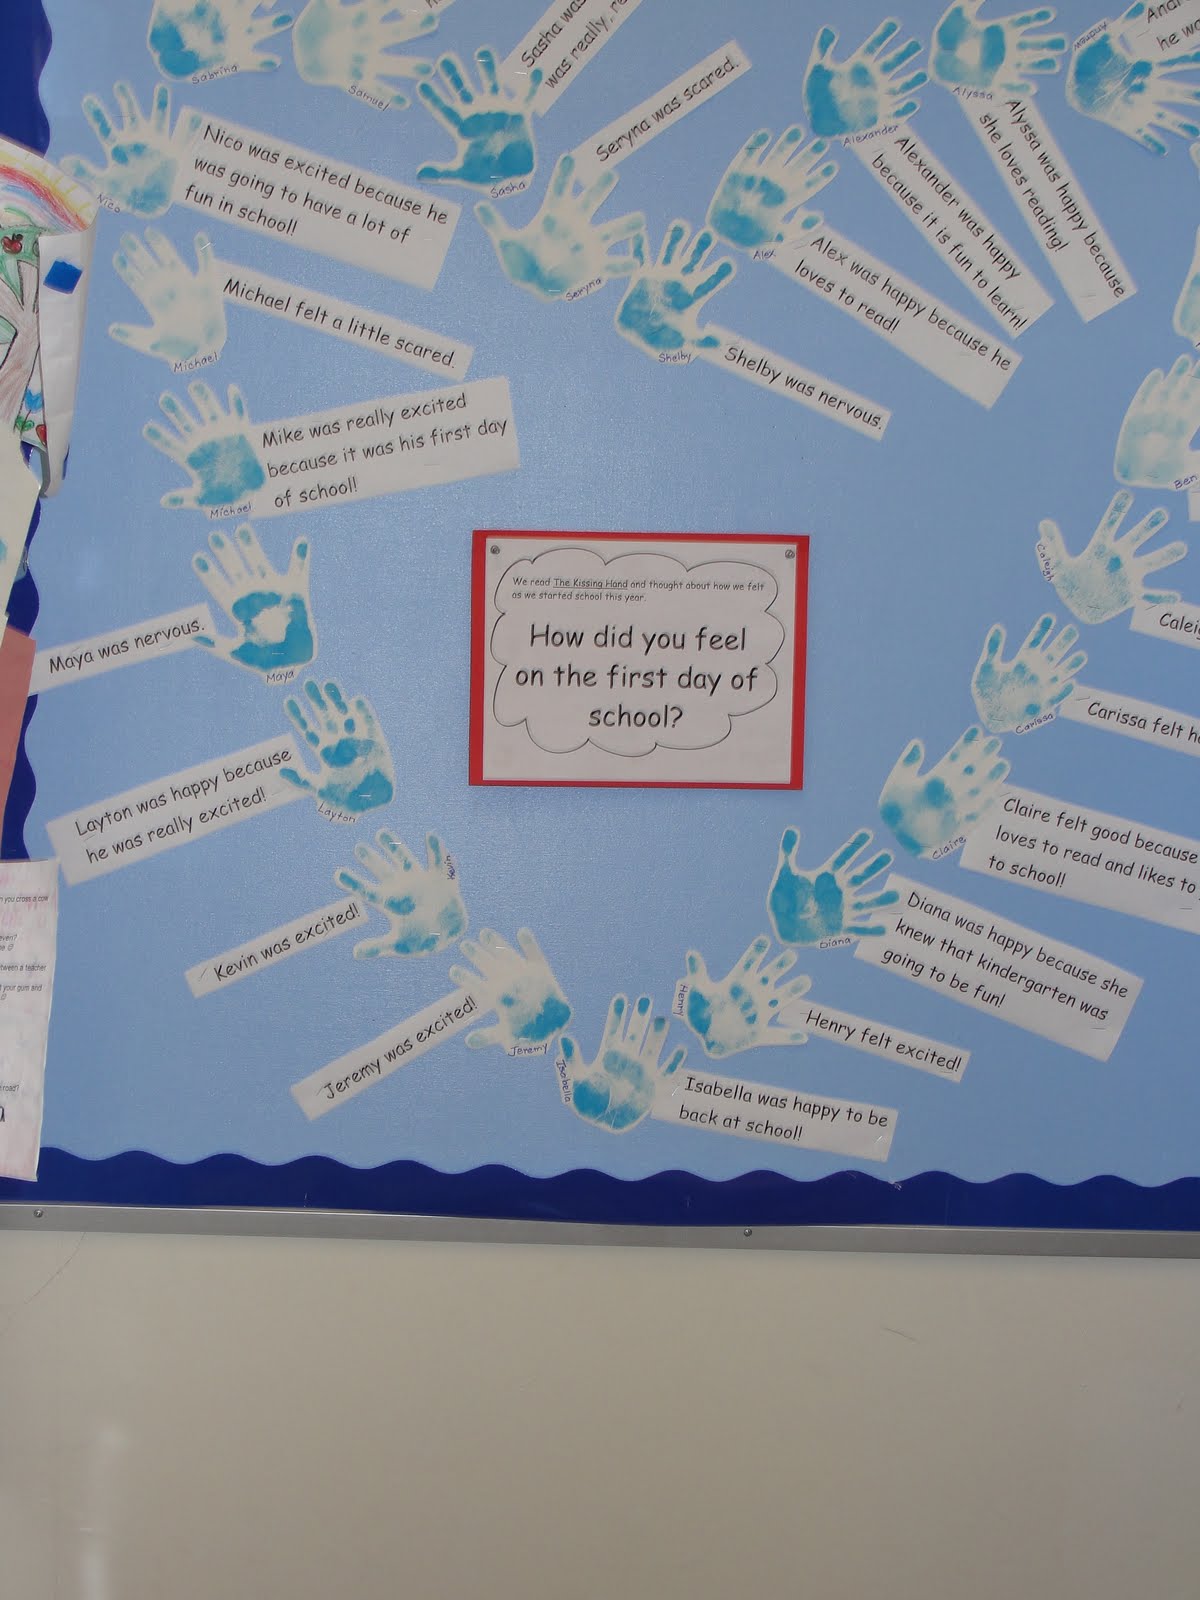
Here is one of my favorite activities for the first day of school. (It even leads to a cute bulletin board!):
First I read aloud The Kissing Hand. Then we discuss the book and how each of us felt about coming to school today. I take quick notes as to what each child says. (I use the prompt "I felt ______" to get them started if they need help.) Then during station time, I have each child create two handprints. (I use those great large round ink pads from Lakeshore. So easy!!!) One handprint is used for a bulletin board display and the other becomes a puzzle.
Bulletin board: I make the bulletin board display after school by typing up each each child's response to how they felt on the first day of school. (Example: Diana felt excited because she was coming to school!) Then I post each child's handprint and typed response on a bulletin board. I post the handprints in the shape on a heart. (Hard to tell in the photo because I used a font that was too big last year.) If I remember, I even place a heart sticker on each handprint or on the typed response. Sometimes I like this board so much that I leave it up all year! (It is so fun for the children to look back on later in the year and laugh about how scared they felt on the first day.)

Hand Puzzle: During lunch, I quickly cut each handprint into about six pieces. It goes home on the first day in an envelope with a poem on front that tells parents to sit with their favorite first grade child and put together the puzzle inside the envelope. I love that it becomes a handprint that parents get to keep as a reminder of their first day of first grade! To make this easier for me, I have the envelopes prepped ahead of time labeled with the child's name and with the poem already glued on. That way I only have to cut out the handprints and put them in the correct envelopes at lunch. I cannot post the poem because I didn't write it myself, but found it on someone else's site (and I can't remember whose site it was. Sorry!)
First I read aloud The Kissing Hand. Then we discuss the book and how each of us felt about coming to school today. I take quick notes as to what each child says. (I use the prompt "I felt ______" to get them started if they need help.) Then during station time, I have each child create two handprints. (I use those great large round ink pads from Lakeshore. So easy!!!) One handprint is used for a bulletin board display and the other becomes a puzzle.
Bulletin board: I make the bulletin board display after school by typing up each each child's response to how they felt on the first day of school. (Example: Diana felt excited because she was coming to school!) Then I post each child's handprint and typed response on a bulletin board. I post the handprints in the shape on a heart. (Hard to tell in the photo because I used a font that was too big last year.) If I remember, I even place a heart sticker on each handprint or on the typed response. Sometimes I like this board so much that I leave it up all year! (It is so fun for the children to look back on later in the year and laugh about how scared they felt on the first day.)
Hand Puzzle: During lunch, I quickly cut each handprint into about six pieces. It goes home on the first day in an envelope with a poem on front that tells parents to sit with their favorite first grade child and put together the puzzle inside the envelope. I love that it becomes a handprint that parents get to keep as a reminder of their first day of first grade! To make this easier for me, I have the envelopes prepped ahead of time labeled with the child's name and with the poem already glued on. That way I only have to cut out the handprints and put them in the correct envelopes at lunch. I cannot post the poem because I didn't write it myself, but found it on someone else's site (and I can't remember whose site it was. Sorry!)
Thursday, July 14, 2011
First Day Name Puzzles
One of my teammates came up with this great idea for the first day that we now have been doing for years! On each child's desk, we have a puzzle waiting. But not just any puzzle, a puzzle that uses their very own name. Just imagine being a nervous first grade entering the classroom for the first time and finding a puzzle on your desk. You put the puzzle together and it spells your name. What fun!
The details:
Each puzzle takes a half piece of card stock (or you can cut up manila folders) about 8 1/2" by 5 1/2". Write a child's name on the card stock - make it really fancy : ). Add fancy squiggles and swirls using a variety of colored markers. Stamp a few stamps using different colors of ink pads. Once you have the paper fancy enough, cut it into about six pieces (the number of pieces depends on the age of your students). Then place the puzzle pieces in an envelope with the child's name on it. (Yes, you can make the name on the envelope fancy, also - we first grade teachers LOVE cute!!!) Prior to day one, place the envelopes on each child's desk. This can be their first activity.
Special thanks to my teammate Marlene for this great idea!
The details:
Each puzzle takes a half piece of card stock (or you can cut up manila folders) about 8 1/2" by 5 1/2". Write a child's name on the card stock - make it really fancy : ). Add fancy squiggles and swirls using a variety of colored markers. Stamp a few stamps using different colors of ink pads. Once you have the paper fancy enough, cut it into about six pieces (the number of pieces depends on the age of your students). Then place the puzzle pieces in an envelope with the child's name on it. (Yes, you can make the name on the envelope fancy, also - we first grade teachers LOVE cute!!!) Prior to day one, place the envelopes on each child's desk. This can be their first activity.
Special thanks to my teammate Marlene for this great idea!
Subscribe to:
Posts (Atom)