Okay, so it really wasn't THAT bad. In fact, most of the day went really well. Really, really well. Until 1:50 and since we dismiss at 2:15, how bad could the last 25 minutes have been? A.W.F.U.L.!!! It wasn't my kiddos, they were great. It wasn't me, I was trying my best to be engaging, which was easy because it was love at first sight with my class.
So what went wrong? Well, at 1:50 our principal came on over the loudspeaker and announced, "Teachers, please lock your doors. Dismissal will be delayed." What???? Keep in mind that I teach in California where the classrooms are not in one building. Instead, our doors all lead to the outside world. That means once I locked the door, I was on my own. The only adult. No bathroom. With a class of kiddos asking, "Why did she say to lock the door?" My response, "I think she wants me to practice locking the door." Huh? I was not at my best since I was clueless as to what was going on. But then my awesome principal (I really do love her), organized the office staff to call each classroom and let us know what was going on. What was going on you wonder? It turns out there was an armed robbery at a nearby bank. One thief got away so the police alerted all of the nearby schools to go into lockdown. A real, true lockdown. Although over the years, we've had lockdown drills, this was my first real lockdown. As soon as the police called, the gates around the school were all closed and locked. All our classroom doors were locked. We were completely safe the whole time. But it was scary! I was so glad that I teach first graders because they were completely clueless as to any problem going on. They were also clueless about dismissal time. We ended up being dismissed at about 2:45 and my kiddos didn't even know they were in school an extra 30 minutes. I was also grateful that I was a veteran teacher and could reach into my bag of tricks and come up with an instant lesson. What did we do? Clay! I had it all prepped for the next day, so I pulled it out and the children were enamored and oh, so sad when I got the "all clear" call and we got to evacuate.
I told you this was the worst first day ever, but it was also the best. The most amazing thing happened as we evacuated. The entire community pitched in to help. Classes were called to the front gate one at a time. There were escorts all along the way ... support staff, district office personnel, parents. All making sure we knew what to do and that all was well. It was so moving to see the support we were being given. I actually started crying (and then had to quickly suck it up so my kiddos wouldn't get worried.) As my class got close to the front gate, a parent announced, "Mrs. Johnson's class". The waiting parents who had children in my class stepped forward and all of the other parents stepped back. I still get teary-eyed thinking about it. And bear in mind that this was the FIRST day of school. Somehow our amazing school community came together and created a safe, nurturing environment in the midst of a lockdown. So on the first day two messages came out loud and clear: Children are loved and protected at this school! AND We are a community that works together!
So that is my first day story. After that, the rest of the week was lowkey. ... and yes, the other thief was caught miles and miles from my school.
Love to all,
Camille
Sunday, September 2, 2012


Saturday, September 1, 2012
My Room With a View
Hi all! I just finished my first week and thought I would show you some photos from my finished classroom. These photos were taken prior to the first day of school. The bulletin boards are sadly lacking student work, but in just five days that has changed! This is my new room and I have never, ever taught in a room this large. I have already told my principal that I love this room so much, I want to stay in it forever!
Welcome to my classroom! My school is located in a city with mild weather so our classroom doors open to the outside world.

This is my third year teaching a kindergarten / first grade combination class. I refer to my class as a "winning combination". Since we are in room eight, we are "Team Eight". The only problem is that I was in room five for about fifteen years so I keep slipping up and calling my class "Team Five". Whoops! My kiddos keep laughing and reminding me of our room number. The other sign to the left of the door is a class list.


Here is the entry to the classroom. I put a bookcase (backwards) next to the door so it would feel like an actual entry way. On the bookcase are my "Stop and Drop" (the short blue tub) which is where students place notes, homework, etc. The two cute tubs are for snacks. Kinders place their snacks in green and firsties in blue. (I try to color code as much as possible since my students have different dismissals and that makes clean up so much easier.)
Here are the two snack tubs close up. They are a Dollar Store find!

This is the other side of the bookcase. This is the main classroom library, but there are tubs in other places in the classroom also. My books are organized by topic or author. Each tub has a number and each book in the tub has a sticker with that number on it. I learned this system on the Sisters website and I LOVE it!!! Oh, if you look closely, you can see my READ letters (Thank you Pinterest!) on the left. I velcroed them to that case. Side note: Who chose this carpet for a classroom? Seriously, it makes my eyes spin in my head just looking at this photo. Walking on it is far worse.

Continuing around the room, here is my read aloud area. There is actually plenty of room for all 26 kiddos to sit, but I know it looks super small - it is NOT!

The calendar area. I tried to place most items low enough for students to reach. It looks way too busy doesn't it? In real life it looks a little tamer.

Pocket chart all ready for day one. I am not sure which blog I got this chant from. But I love it! So thank you to the creator!

Our math manipulatives. All tubbed and labeled and ready to go!
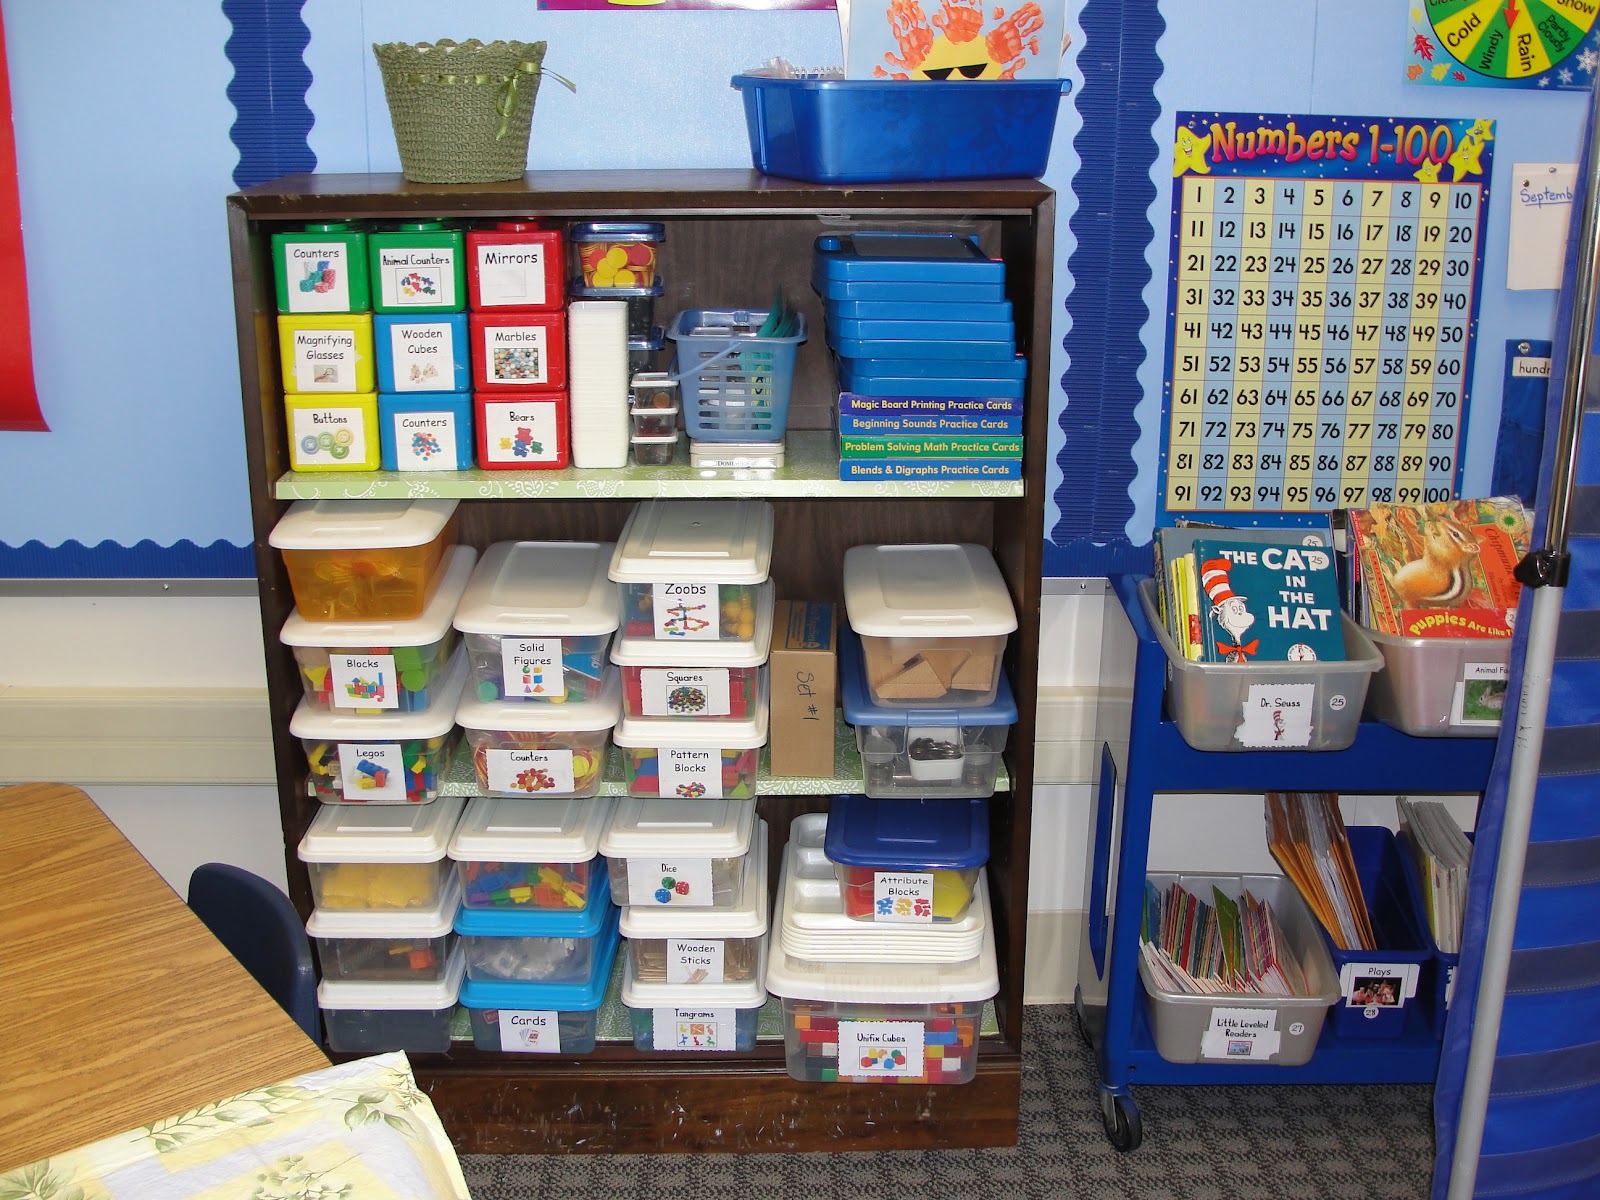
Okay, time for an age test. Are you old enough to recognize these containers? If not, they originally contained wet wipes about 15 years ago. I used to have parents of babies save them and send them in. I have been using them ever since. I only wish I had more!

Here is my small group teaching table. It won't normally look like this, but I wanted it cute for day one. Behind it are more books, and two bulletin boards. One is for FACE / CAFE and the other is the Word Wall.


An EL teacher once told me to use photographs whenever possible, so I love these cards for the Word Wall. This wall now contains all of our names. I had each student walk up and show me where his/her name should go. Harder for some than for others!!! Oh, I do love this blue color so much. I painted all of my bulletin boards this color.

Birthday bags ready to go. Thank goodness since I had a birthday on Day One!!!! This was the first time I put border around a white board and I love it! Thank you Pinterest! Oh no, here is my voice chart and I can't remember who to credit. Sorry times a thousand!

My Welcome Sign a la Pinterest. I purchased the black letters from Fourth Grade Frolics at TPT. Here is the link. I actually meant to cut out triangles to glue them on, but I got distracted and starting cutting out circles. By the time my brain re-engaged, I had already cut several circles so I went with circles. What a dope! You can't tell, but blue and green paper is totally adorable. I got it from the Dollar Store.
Behind the Welcome Sign is my almost new Smartboard. Sigh, I love it so! BUT I have so much to learn about truly using it to its full capacity!!!

My area. Teacher computer (also used by students as needed), my Pinterest inspired organizer, and various pens, etc. The blank spot has now been filled in with my document camera. (Thanks to the marvelous IT guys in my district!!) I made the table skirt two years ago and velcroed it to this table to hide all the wires and electrical boxes, etc.

More books, more books, more books. (I have over a thousand books. Not sure how many over.)
The bulletin board is for our monthly TLC quilt squares. The title reads: Our Class Quilt. You can order the TLC Quilt Book here. I highly recommend it!! If you teach kinder, prekinder or first be sure to check out the many wonderful TLC books that are available at their site.

Our computer area. We stopped using our computers last year when we got iPads. Not sure what this year will hold.

... and here we have my favorite of all favorites: my filing cabinet! In case you missed my previous post, I painted this myself and do love it so! It was once a plain, gray filing cabinet. Now it is my pride and joy! (Oh, please do not panic ... I do love the kiddos in my class even more than I love this file cabinet!)

Check out all this counter space! (Sorry for the dark photo!) There are cabinets underneath the counter and I am amazed at all this storage space. (Of course, I have already filled it.) On top of (and under) that table are more books that need to be numbered to go into bins.
Look at all those windows and that great view of trees. L.O.V.E.

One more small group area. Not sure how I will use this yet.

I don't have cubbies (and wish I did!) so instead I use these drawers to sort student work. Back in the good old days (three years ago) I only needed 20 drawers. But now I need 26 for my class. I am hoping we stop at 26, but I look at other schools in California and see that many of them have 30 or more in kinder and first grade so I am thinking that my numbers may go up in future years.

I feel like I took a billion photos, but realize now that I left out the back part of the room. I think maybe it was so messy that day that I didn't want to photograph it. Now the messiness is shoved into cabinets and may never be straightened out.
Thank you for touring my classroom with me!
Love to all,
Camille
Monday, August 20, 2012
Made It and LOVE It!!
This is my third and last "Monday Made It" post. Goodbye to lazy summers and hello to school starting!

Oh, I so love my two newest projects. Love, love, love them!
First up: Lovely Curtains
I already showed you my little curtain for my window in the door. I liked it so much that I decided to make curtains for all of my windows. I got the inspiration from here. However, I could not find an adorable plastic tablecloth so I found a paper one I loved and laminated it. (Thanks to Lakeshore and their 29 cents/foot laminating charge, my total cost for tablecloths and laminating came to under $20. Not too bad since I have 34 feet of windows!!!) Yes, my new room is giant-sized and I have windows running the entire length of one long wall! Love, love, love!


...and now onto my favorite of all favorites ... My File Cabinet. True confession: I am in love with my file cabinet!
I got the inspiration from here.
I did not take a before picture so you will have to imagination a perfectly fine, gray file cabinet. Nothing wrong with it at all. But nothing to write home about. Now look at it:

And here is another look:

And a closeup:

Love, love, love, love, love!
First I spray painted the file cabinet. (My beloved custodian hauled it outside for me and then brought it back in the next day when it was dry.) Then I used a white paint pen to draw the lines. I know it looks like a five year old drew those lines, but it was me trying my best! I actually think those crooked old lines look quite charming! So this file cabinet is now, officially, my favorite part of my room.
Be sure to check out the inspiring projects over at Tara's Fourth Grade Frolics!
Love to all,
Camille
Monday, August 13, 2012
Monday Made It Number Two!
Tara over at Fourth Grade Frolics is already on Monday Made It #11, but this is just my second time to link up.
I have been painting like crazy in my new room. First the bulletin boards, then the bookcases and then ... anything that didn't move. (Well, not really, but almost!!!) Besides painting, I did FINALLY made a few Pinterest items that it seems like EVERYONE else made months ago. Try not to be too, too, too bored. Here they are:
1) READ letters

I love these! I used scrapbook paper and ModPodge. This was my first ModPodge project ever. The bubbles were unexpected and a pain, but with persistence, I got rid of most of them. A few stayed, but I still love my letters.
2) Teacher's Toolbox

While a friend was in my classroom today, she asked me for a postit. Rather than just handing her one, I dragged her over to my toolbox so she could watch me open the labeled drawer and pull out a postit. What a dope I am! But she is a sweetie so she oohed and awed over my toolbox. Heh heh!
Be sure to check out the amazing, brilliant, creative things that other teachers are making over at Fourth Grade Frolics!
Once I have the painted furniture in place, I will post pictures. I am so excited that my classroom is starting to shape up and look like an actual classroom (versus a storeroom filled with boxes).
Love to all,
Camille
Monday, August 6, 2012
Monday Made It!

Hi all! It is still Monday for a few more minutes here so I am going to take part in Monday Made It!!! This is a first for me. Every week I carefully read all the amazing posts about what you all have made. Now, FINALLY, I get to add one. Don't get too excited ... but here are my Monday Made Its ...
Exhibit #1: Cute decorations for the classroom
My last name starts with a J and I just moved to room 8 so these two items will hang somewhere in my new classroom. I especially love the 8 because I used a paint pen (FOR THE FIRST TIME EVER) to make those dots. I may make them on the J also, but I don't want to go overboard.

Exhibit #2: Birthday Bags
Actually a former class mom and dear friend decorated these for me. (Thank you Melynda!!!!) I set out lots of stickers and she got to be creative. Then I stuffed them with goodies that will be loved by five and six year olds. Usually I put their names on the bags but this year I am doing it differently. (Do you notice the beautiful blue bulletin board in the background? Read more about it in Exhibit #3!!!)

Exhibit #3: My BEAUTIFUL Bulletin Boards
This may not technically be a "Made It", but I am going to count it. Since I moved to a new classroom, I decided to paint my bulletin boards. This is the third time I have painted bulletin boards and the other two times it was super easy; NO problems. This time was a nightmare. The paint started running, it was all streaky. I ended up putting on three coats of paint and used up two gallons of paint. YIKES!!! That is a lot of paint!!! (...and remember, I only painted my bulletin boards, not my walls). All I can think of was that I started on a hot day and that caused all of the initial problems. BUT now (three coats later), I LOVE, LOVE, LOVE how my boards look. I have had many compliments already (and I don't even have a single thing on my boards yet ... except one birthday bag). Now I can smile and say it was worth it ... but if you had talked to me last week, there were moments when I thought I would have to cover the paint with butcher paper. BUT now I am happy and it is so, so, so lovely!

Exhibit #4: My New Curtains
I saved my favorite for last. I made a curtain for the window in my back door. (My new classroom has TWO doors.) The sun was shining in so this is not a great photo. But I am in love with this curtain. (Oh, have you figured out that I am having a blue and green classroom? Blue and green are my favorite colors. I love nature and love the blue sky and all the green found in plants. So having lots of blue and green in my classroom makes me feel like I have brought nature inside.)
So ... I got the idea for this curtain from Mrs. Anderson at Welcome to First Grade. Here is the link. That brilliant teacher found two plastic tablecloths at Target and cut them in half to make a valance for her blinds. I loved the idea, but couldn't find any plastic tablecloths that I loved. I found this one at Party City, but it was paper. I knew it wouldn't last long. But I really, really loved it. So I laminated it. Perfect!!! It is being held in place by magnets right now because this is a metal door. I will probably end up using velcro dots to hold it in place. I am also going to laminate more of the tablecloth to create a valance for my blinds, just like Mrs. Anderson.

Now, be sure to go on over to see all the other Monday Made It projects at 4th Grade Frolics. Thanks Tara for creating this great linky party!
Love to all,
Camille
Friday, August 3, 2012
iTalk iPads - Guide
This post is dedicated to my new bloggy friend Erica from Minnesota. Erica sent me the following email:
8) Prepare for Negativity! I hate to bring this up, but want to forewarn you. Please realize that there may be jealousy and misunderstanding from other teachers. It has nothing to do with you, so just let it go. The teachers at my school were supportive, but not so at some of the other schools. Comments were made about our students not using pencils, paper and paintbrushes, but instead sitting and playing Angry Birds all day. I typically stayed very quiet at district meetings, but looking back I wish I had shared what it actually looks like in my classroom. The fact that my students do use pencils and paper and paintbrushes. They also use clay and crayons and construction paper. They build with blocks and legos and Lincoln logs. You get the idea. We found humor in the anonymous quote "You can always tell who the pioneers are because they have arrows in their backs and are floating down the river."
Hi Camille,
I came across your blog and am in LOVE. I am feeling your adrenaline as I recently found out my teaching partner and I were awarded a class set of iPads for our kindergarten class. AHHHHH!!! I am sooo not ready and we start in 3 weeks! Exciting and scary. Do you have any other advice for newbies just getting started- organization wise/setup etc? I am all ears in case you do. Erica
Well, my life has been crazy and my head has been spinning so fast that there was no way I could think of one single thing to post about. Erica to the rescue! Seriously, how could I not respond to this sweet email? So here goes ....
Camille's Quick Guide to Getting Your iPad On :)
Disclaimer: I first touched an iPad on March 26, 2012. A class set of iPads arrived in my K/1 class on April 16, 2012. GULP! My kiddos used iPads for 7 weeks. So repeat after me: Camille is NOT an expert!! Camille is NOT an expert!! Camille is NOT an expert!!
Okay, onward we go:
1) Smile! Smile and enjoy the moment. Magic happened and you, yes you, are getting a class set of iPads!!
2) Practice! Get your hands on one of the iPads as soon as possible. Give yourself permission to play with it. Get comfortable using an iPad. If you already have one, great, but make sure it is the same (1, 2 or 3) as your students are receiving. This was super important for me because I had never used an iPad before. Luckily, I have a MacBook and an iPod so had a beginning familiarity.
3) Be Aware That Your Students WILL Become Experts! No matter how much time you have spent using an iPad, you WILL have students (yes, even kinders) that will know more than you. Accept it, celebrate it, rejoice in it and learn to ask your kiddos for advice. I learned the true meaning of "digital native" when I placed iPads in my students' hands. Also, your kiddos will automatically became collaborative when using their iPads. It is amazing to behold! Have your camera ready at all times!!!
3) Learn to Download Apps the District Way! Find out how you are going to download apps. Talk to your IT people about that. You will need a special iTunes account. Find out how this is going to be handled. Our six teachers were each given our own account and password. I am making this sound very simple, but it can become super complex. In some districts teachers are not allowed to download apps, that is up to the IT people. We were given free rein (lots of trust here and I LOVE that). We were given a small budget to work with, but strongly encouraged to seek out free apps. (More on that in #3.)
3) Investigate Free Apps! Know that apps can be very, very expensive. Two dollars may not sound like much, but multiply that by 26 iPads and OUCH!!! If you do find apps you want, look into the Apple school voucher program which gives you half off when you buy in quantity. (Note: Not all apps qualify for this, but most do.) However, I would encourage you to look for free apps. In the primary grades, we have thousands of free apps to choose from. Some of them are fantastic! Here is my post on my favorite free apps. Get connected with a free app website or email list. There are many out there and they work in different ways. My favorite is Smart Apps for Kids. I have signed up for their daily email and each day receive a summary of their "Free App of the Day". I like that there is not a long list, but just one app so I can make a quick decision as to whether this app would work for us or not. They also send out emails if a great app suddenly becomes free for just a day. (Companies like to do that to boost their numbers quickly.) If I see a free app that might work for my class, I quickly download it because it may not be free tomorrow. Then later, I try it out and may end up deleting it.
4) Plan! There is not one right way to set up your iPads. However, iPads are different than desktops or even laptops because they are personal devices. You will want each child using the same iPad each time. So we numbered ours and the students always knew which iPad was theirs. Here is my post on how I organized my iPads.
5) Questions to Ask! Become good friends with your IT people. Really, really good friends! (The six teachers involved with the iPad Academy in my district have nicknamed our IT guys "The Magic Men".) Here are some questions to ask:
- What is the procedure for downloading apps?
- Is there a budget for downloading apps?
- What is the procedure for syncing iPads? (Syncing allows you to add apps to ALL of your iPads at the same time, rather than individually adding them for each iPad. See #7 for how I go about this.)
- Is there enough bandwidth in my room for all students to be on the internet at the same time? If not, what is the limit?
- Are we allowed to use an app like Rover so that students can access sites that use Flash? (Since Apple and Flash are mad at each other, you have to use a third party app like Rover to deal with this. Rover basically streams the Flash sites onto the iPads. My IT guys checked out Rover and approved it. It was created for teachers and is free. It does NOT keep information on students stored anywhere.)
- Where will the iPads be housed at night? (I take them to the office at the end of each day because it is the only building on campus that is alarmed. Oh, side note: I am in California and out here, our schools are typically not all under one roof.)
- Will the iPads go home with the students? (We do not send the iPads home ever. But some districts do allow for that.)
6) Glitches Will Occur! Not only are we dealing with technology, we are dealing with new technology. Be prepared to be frustrated at times. You cannot just go down the hall and ask a veteran teacher what to do. Your questions may even stump your own "Magic Men/Women". But together, you will prevail. (How cool that there are two of you that are beginning your iPad journey together!!)
7) Accessories! Yes, even iPads need accessories. What you get will depend on your budget. But here are some ideas:
- Cases - Ahead of time a friend told me I had to get "grippy" cases. I didn't know what she meant, but now I do. You need cases for the iPads that are not slick, but instead are "grippy" so that the students can hold onto the iPads. If given a choice, get them in different colors to make the cases easier to differentiate. Mine are all black, so I used four different colors of tape and ran a strand along the front of each case. The tape won't hold up forever, but it will help in the beginning.
- Stylus- Since my kiddos are just learning to write, I use several handwriting apps and want them to practice the correct grip. Using your finger to practice making letters just doesn't cut it for me. I looked around and picked the AppCrayon from Dano. These are pricey, but Dano gives a 50% discount to schools. There are much less expensive ones, but I liked Dano because it was fatter and triangular in shape so it helps primary students grip correctly. Dano also has a free app called AppCrayon that is good.
- Charging / Syncing Cart - My district provided a cart that allows us to both charge and sync. I LOVE IT! Syncing is a pain, but this cart makes it manageable. There are some glitches with this cart, but still it makes it possible to sync all my iPads at once. (Glitch: Sometimes the cables don't connect correctly and a few iPads don't sync so you have to go back and manually sync those. The first time this happened it caused tears in my class because one sad girl didn't get the new apps that everyone else did. After that, I knew to check.)

7) Think about your philosophy! There is no right answer here. My decision was to view the iPads as tools. Just like my kiddos use pencils, paper, etc. so they use iPads to aide their learning. They got their iPads out of the cart first thing in the morning and had them available in a team tub on their desks all day. I feel like I only scratched the surface in terms of using the iPads as tools. This year, I plan to integrate them far more. Not sure what that will look like, but I will keep you posted.
9) You ARE a Pioneer! You are taking part in something that is so new and different that there are no manuals to help you on your way. I told my students that it was our job to do research for the district. The question we were supposed to answer was, "Do iPads help students learn? Of course my kiddos all knew the answer before I did. (A resounding YES!!!)
Here is a quote to leave you with: “A pioneer is not someone who makes her own soap. She is one who takes up her burdens and walks toward the future.” Laurel Thatcher Ulrich
So there will be glitches, there will be issues, but your iPad journey will be amazing! So just start walking!
Whew! Longest post ever! Hope this helps!
Love to all,
Camille
Links to learn more:
I Teach With iPads - Katie has been using a class set of iPads for a few years and I feel like she is my mentor!!! (I have only met her in Bloggyland, but I think she is A.M.A.Z.I.N.G.)
Wednesday, July 4, 2012
Four on the Fourth
Happy Fourth of July everyone!
After a great BBQ and spending a fun afternoon with my dad and sister, I am ready to continue the celebration by taking part in Four on the Fourth. Thank you to the divine Ms. M for hosting a linky party in which we share four things we are going to try during the next school year. Click here to see all of the responses.

My four ideas for next year:
1) I am moving to a new classroom. I LOVE my current classroom, but the new room is even better!! But moving is a difficult task!! I am in the process of sorting and packing and moving boxes and then unpacking right now. I am very proud of myself for throwing, recycling, and donating so many items. I am also embarrassed by the abundance of items I have found. I mean really, how many ________ does a girl need? (Fill in the blank with just about any item, and chances are, it is something that I have found way too many of as I am packing up. Oh, except money. Except for a penny here or there, I do NOT have an abundance of money.)
2) I will be creating a completely new floor plan for my new classroom. Not only is this classroom bigger, but the cabinet arrangement is different so I am forced to rethink my whole setup. This thrills me because I am really thinking about what is best for my students in terms of furniture arrangement.
3) One goal that I have is to keep my teacher supplies more organized. (This goes along with number one and my current mess!) I don't have a teacher desk, but instead pile things around the room ... in many places ... some of which I can't find later. So to help myself, I made a Pinterest inspired teacher organizer. So cute! My plan is to keep all of my teacher supplies in ONE location. Wish me luck!
4) The kindergarten teachers have been given the go ahead in my district to implement the Common Core Standards. Hurrah! Wait a minute, this means we will need to rethink a lot of things. Yep. Exciting, but lots of work! (Oh, I will be once again teaching a kinder/first grade combination class so really I am supposed to be doing Common Core with kinder and the regular California standards with the firsties. Hmmmm .... me thinks I will also switch my firsties to Common Core, also ... at least in math.)
Okay, that is four. I am done! Good night to all!! Tomorrow it is back to sorting and tossing and recycling and donating and packing for me.
Love to all,
Camille
Subscribe to:
Posts (Atom)